Verifying Maven Configuration
Maven needs to be configured for the GWT-Maven plugin to work correctly, so navigate to your HOME - Folder and make sure there is a valid Maven configuration file. If your username is john, then these would be valid configuration file locations:
   Linux → /home/john/.m2/settings.xml
  MacOS X → /Users/john/.m2/settings.xml
  Windows XP → C:\Documents and Settings\john\.m2\settings.xml
If you can't find .m2/settings.xml, then create it with the following content:
   <settings xmlns="http://maven.apache.org/POM/4.0.0"
         xmlns:xsi="http://www.w3.org/2001/XMLSchema-instance"
         xsi:schemaLocation="http://maven.apache.org/POM/4.0.0
                             http://maven.apache.org/xsd/settings-1.0.0.xsd">
      <localRepository>${user.home}/.m2/repository</localRepository>
  </settings>
(Check out Maven Settings Reference for detailed information on configuring Maven.)
Setting up Eclipse IDE
Download Eclipse IDE for Java EE Developers at Eclipse Downloads, install and launch.
Setting up Maven Integration
- Navigate to Help > Software Updates and select the Available Software Tab. Click Add Site... and enter the URL below:
http://m2eclipse.sonatype.org/update
- Click OK
- Expand the m2eclipse.sonatype.org/update node and check Maven Integration:
- Click Install...
- Click Next, accept the license and click Finish
- Click Yes when you are asked if you want to restart Eclipse
Creating the Project
- Navigate to File > New > Project...
- Select Maven > Maven Project and click Next twice
- If you've already installed the GWT-Maven Archetype, you can skip the next step
- Click Add Archetype..., enter the values below and click OK
    Archetype Group Id: com.totsp.gwt
    Archetype Artifact Id: maven-googlewebtoolkit2-archetype
    Archetype Version: 1.0.3
    Repository URL: http://gwt-maven.googlecode.com/svn/trunk/mavenrepo
- Select Archetype maven-googlewebtoolkit2-archetype and click Next
- Provide your Maven - Properties and click Finish. Example values:
    Group Id: com.acme
    Artifact Id: helloworld
    Version: 0.0.1-SNAPSHOT
    Package: com.acme.helloworld
- Open your pom.xml in the Maven POM Editor by double-clicking it
- Select the Repositories Tab
- Click Add... and provide the values below * :
    Id: smartclient
    Name: smartclient.com
    URL: http://www.smartclient.com/maven2/
- Save your pom.xml and check the Maven Console output for errors
- Select the Dependencies Tab
- Click Add... and provide the values below:
    Group Id: com.smartgwt
    Artifact Id: smartgwt
    Version: 1.0b2-SNAPSHOT
- Save your pom.xml and check the Maven Console output for errors
Modifying the Application
- Modify the generated Application.gwt.xml (add the line in bold)
  <module>
       <inherits name="'com.google.gwt.user.User'">
          <inherits name="'com.google.gwt.user.theme.standard.Standard'">
             <inherits name="'com.smartgwt.SmartGwt'"></inherits>
             <entry-point class="'com.acme.helloworld.client.Application'">
                <stylesheet src="'Application.css'"></stylesheet>
             </entry-point>
         </inherits>
      </inherits>
  </module>
- Modify the generated Application.java (replace all content)
  package com.acme.helloworld.client;
  import com.google.gwt.core.client.EntryPoint;
  import com.smartgwt.client.util.SC;

  public class Application implements EntryPoint {
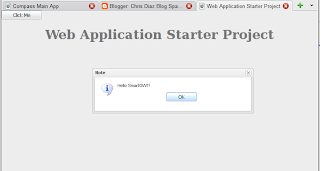
     public void onModuleLoad() {   SC.say("Hello SmartGWT");  }
  }
- Modify the generated Application.css (remove all content)
You need to remove all generated CSS - Styles because they would break the SmartGWT layout.
You can add your own Styles if they don't conflict with SmartGWT, of course.
Running the Application
- Right-click your pom.xml and select Run As > Maven build...
- Enter the value below into the Textfield labeled Goal:
gwt:gwt
- Click Run to start your Application in the GWT Shell
SVN Snapshots
If you want to develop against the latest snapshot from SVN use the repository and artifact properties below:
   Id: smartgwtsnap
  Name: smartgwtsnap.rorschach.de
  URL: http://smartgwtsnap.rorschach.de
   Group Id: com.smartgwt
  Artifact Id: smartgwt
  Version: 1.0b3-SNAPSHOT
More Goals
Appending -U tells Maven to check for updates of -SNAPSHOT dependencies.
All Goals for GWT-Maven can be found here.
- clean → Purge working directory (target)
- gwt:gwt → Build Application, Run in Hosted Mode
- gwt:test → Build Application, Run GWT-Tests
- javadoc:javadoc → Generate API-Documentation (→ target/site/apidocs)
- package → Build Application, Run Non-GWT-Tests, Run GWT-Tests, Build WAR-Archive
- test → Build Application, Run Non-GWT-Tests, Run GWT-Tests
List of Goals Example
Maven supports a comma or space separated list of Goals:
clean package javadoc:javadoc -U
- Checks for updates of -SNAPSHOT dependencies (-U)
- Purges the working directory (clean)
- Builds the Application (package)
- Runs the Non-GWT-Tests (package)
- Runs the GWT-Tests (package)
- Builds the WAR-Archive (package)
- Generates the API-Documentation (javadoc:javadoc)
Troubleshooting
Problems loading gwt-dev libraries
Can't load library: [...]/.m2/repository/com/google/gwt/gwt-dev/1.5.3/[...]
The GWT-Maven plugin didn't pick up your local Maven repository location when it tried to extract the GWT development libraries. The libraries probably have been extracted to a folder named ${settings.localRepository} inside your workspace. You can delete this folder, of course.
Verify your Maven configuration, delete the folder com/google/gwt/gwt-dev inside your local Maven repository and retry.
Problems loading libxpcom / libstdc++
   ** Unable to load Mozilla for hosted mode **
  java.lang.UnsatisfiedLinkError: [...]/libxpcom.so: libstdc++.so.5: cannot open shared object file: No such file or directory
Version 5 of libstdc++ isn't installed.
Install the package libstdc++5 and retry. If you're running a Debian-based distribution like Ubuntu use apt-get:
sudo apt-get install libstdc++5
Warning: Locking assertion failure
Locking assertion failure. Backtrace: #0 [...]
There is some sort of problem with how the JRE was built.
Can be found here.
sudo sed -i 's/XINERAMA/FAKEEXTN/g' /usr/lib/jvm/java-1.5.0-sun/jre/lib/i386/xawt/libmawt.so
and / or
sudo sed -i 's/XINERAMA/FAKEEXTN/g' /usr/lib/jvm/java-6-sun/jre/lib/i386/xawt/libmawt.so
NoClassDefFoundError: GWTShell
   java.lang.NoClassDefFoundError: com/google/gwt/dev/GWTShell
     Caused by: java.lang.ClassNotFoundException: com.google.gwt.dev.GWTShell  [...]
     Could not find the main class: com.google.gwt.dev.GWTShell.  Program will exit.
There is a problem with the path to your local Maven repository.
Make sure the path to your local Maven repository doesn't contain any non-US-ASCII characters, e.g. an Umlaut.


